Static Site Generation and Deployment with Kobweb
- Background
- Compose HTML / SPAs
- Kobweb to the rescue
- How to deploy a static website
- Common steps
- Netlify
- GitHub Pages
- Conclusion
Kobweb is a framework built on Compose HTML, which itself is a reactive web UI framework from JetBrains that allows you to create web apps in Kotlin using a powerful API.
You can also read more about Kobweb from this earlier post.
In this post, we'll talk about how to use Kobweb to export your Compose HTML project into a format that can be consumed by various static website hosting providers. This means you can get fast and cheap (often free!) hosting for your Kotlin website.
Background
These background sections are provided for people new to the world of frontend development and/or who are curious about Kobweb.
However, if you're ready to get your hands dirty, feel free to skip over them▼.
Compose HTML / SPAs
Compose HTML is an excellent tool for building a single-page application (SPA).
That is, it produces a single, minimal index.html file plus some JavaScript that can be used to rearrange your app at runtime.
Once the page is loaded by the browser and its script starts running, it continuously modifies the page's DOM in place to give the user the illusion that they're actually navigating around multiple pages as they click around on stuff.
Let's discuss a concrete example.
Assume you already navigated onto a Compose HTML site, say https://mysite.com.
Next, you click on a link on the home page that takes you to another page on the site, like https://mysite.dev/blog/about-me. The site actually intercepts the navigation request and prevents the browser from handling it.
At this point, the URL path gets parsed. Based on the result (in this case, the value "/blog/about-me"), the site will dynamically choose to start rendering a new page associated with that path (perhaps mysite.pages.blog.AboutMePage()).
In other words, the core of your project is essentially a giant switch statement acting on a string value. You can imagine something like the following pseudocode:
// Inside your main `renderComposable`
val path = getPath() // Path updated when browser URL changes
when (path) {
    "/" -> mysite.pages.HomePage()
    "/blog/about-me" -> mysite.pages.blog.AboutMePage()
    "/blog/kobweb-tutorial" -> mysite.pages.blog.KobwebTutorialPage()
    // ... etc. ...
}
Now, let's say my use-case is I want to visit https://mysite.dev/blog/about-me directly. Perhaps my friend sent me that link on a social media post.
With Compose HTML, what I really want to do is visit https://mysite.dev and allow it to intercept the URL value and re-render the page with new content.
If you want your site to be served by a static website host provider, you should be aware that they are very simple. They blindly serve static files.
So if a user makes a request to a static website host provider for the path /blog/about-me, then a file called blog/about-me.html better exist on it or else that user is getting a 404 error.
Some static website host providers actually allow configuring rules to allow redirecting to a fallback page, but sometimes it's a hack (like creating a fake 404.html page) while many simply do not. We'll sidestep this nuance for the rest of this article, as the approach discussed below should work universally across all static hosting providers.
Kobweb to the rescue
Unlike Compose HTML, Kobweb can handle this problem because it sits one level above it. It is aware of all the pages on your site (since it is the one that generates the routing logic for you).
A major part of the Kobweb experience is its CLI binary. The relevant command in this case is:
$ kobweb export --layout static
When you ask Kobweb to export your site, it will spin up a local Kobweb server, visit each page in turn, and save out its state to an html file. In this way, Kobweb can turn your dynamic Compose HTML pages into static snapshots.
How to deploy a static website
For this article, we'll discuss two options, for two very popular (and, more importantly, free!) providers: Netlify and GitHub Pages.
Note: I am not affiliated with or sponsored by Netlify or GitHub in any way. Their inclusion here is because they are what users in my Discord server mentioned they were familiar with.
We'll start with steps common to both approaches.
Common steps
Requirements
git- A GitHub account / familiarity with GitHub
- The
kobwebbinary (installation instructions)
Create a project
If you already have a project, you can skip this step.
Otherwise, run the following command, so you'll have something concrete to work with for the rest of this article:
$ kobweb create app
# Kobweb asks a bunch of questions, but defaults should be fine
$ cd app
The above steps should have offered to initialize your project with git, but if you told it not to or if it didn't work for some reason, you can manually initialize it yourself:
$ git init -b main
$ git add . && git commit -m "Initial commit"
Create a new GitHub repository
Follow the official instructions to create a new GitHub repository. You can choose whatever name you want. I used kobweb-netlify-demo for Netlify and kobweb-ghp-demo for GitHub Pages.
When given an opportunity to populate this repo with a README and .gitignore, don't! Since Kobweb already creates them for you.
When finished, sync your local project with the GitHub repo:
# REMOTE_URL looks something like
# https://github.com/<user>/<repo>.git
$ git remote add origin <REMOTE_URL>
$ git push -u origin main
Netlify
Note: You should have finished the common steps▲ first. If you want to use GitHub Pages instead, skip to that section▼.
Netlify is becoming a popular solution for developers who want to create static websites that get served fast. They detect changes to your GitHub repository and publish your site in seconds.
Sign up for a Netlify account
It's free! Sign up here.
Integrate Netlify with your repo
- Go to your dashboard on your Netlify page
- Click on the
Add new sitebutton - Choose
Import an Existing Project - Choose
GitHubas your git provider - Follow any authorization steps to tell Netlify about your new Kobweb repo
- Choose your repo from the list
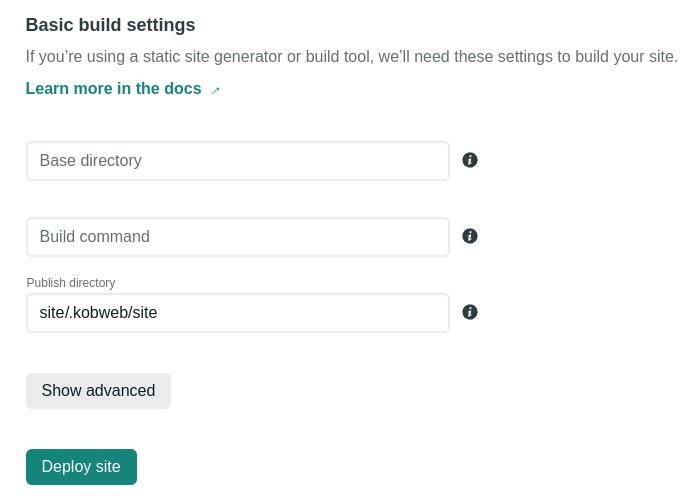
Eventually, you will reach a page that asks you to provide build settings. Leave everything blank except for the publish directory field, which you can set to site/.kobweb/site:
Allow .kobweb/site in gitignore
By default, Kobweb is set up so that you don't check your exported site into source control.
However, for simplicity with Netlify's workflow, we're going to commit our exported site directly into our repository.
Open up the .gitignore file in your project's site/ folder and add the line !.kobweb/site to the bottom:
...

# Kobweb ignores
.kobweb/*
!.kobweb/conf.yaml
!.kobweb/site
Export your site
# in kobweb-netlify-demo/site/...
$ kobweb export --layout static
This will run for a little while. When finished, run
$ git status
to verify that new files are now ready to be added.
If not, double-check your .gitignore changes from the last step and also make sure that files were actually written to your .kobweb/site folder.
Push your site
$ git add . && git commit -m "Exported site"
$ git push
Netlify: Finished!
If everything went well, you should have a page that is either deployed or well on its way! It only takes a few seconds once Netlify is aware of the pushed changes.
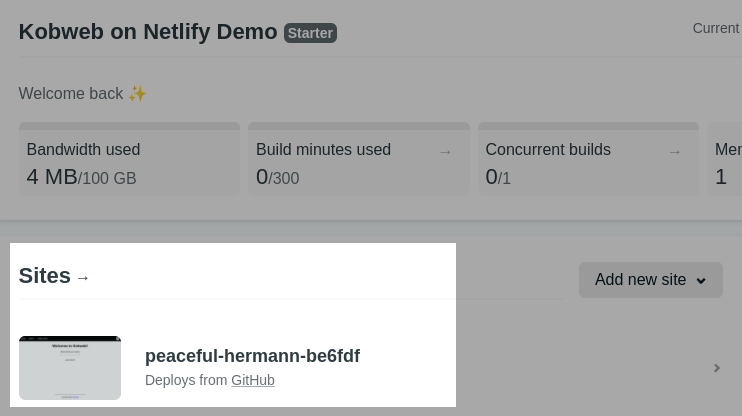
Go to your Netlify dashboard. You should see an entry like the one I have here:
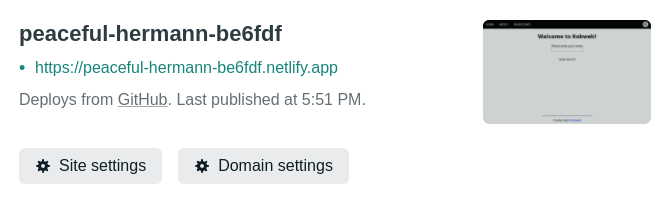
Click on it, and you should be taken to a page that has your URL in it:
If you click on the link, you should see a site that looks like this.
If so, congratulations! You're done. 🎉
If you're still having issues, feel free to compare your project with mine.
GitHub Pages
Note: You should have finished the common steps▲ first. If you want to use Netlify instead, go back to that section▲.
There are a few options for configuring GitHub Pages, and discussing them all is out of scope for this post. Instead, we'll go with a modern approach -- using GitHub Actions to automatically deploy a new site after code gets checked in.
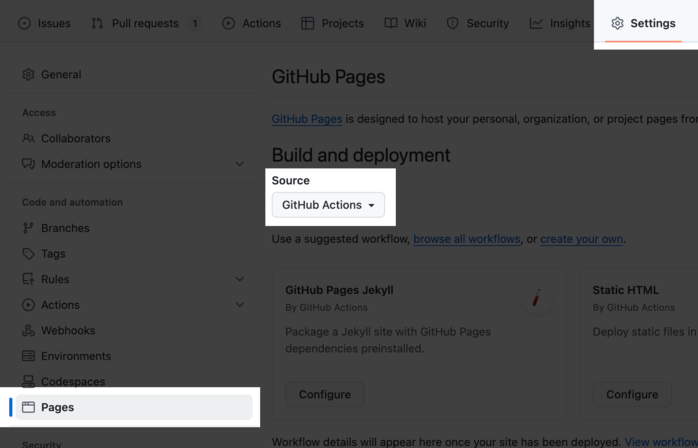
GitHub repo settings
- Go to your repo's project on GitHub and click on the
Settingstab - In the
Code and automationsection of the sidebar, clickPages - Set the
Sourcepulldown toGitHub Actions
You can ignore the rest of the page, where it recommends using a suggested workflow. We'll be creating our own in the next section.
GitHub Actions workflow
GitHub Actions is GitHub's approach to automating work, which is commonly used for continuous integration. A workflow is a script which defines one or more related jobs that run together in response to some event.
We'll create a workflow which exports your site and deploys the result to GitHub Pages.
In your project's .github/workflows folder (which you can create if it doesn't exist), create this YAML file (I called mine export-and-deploy-site.yml but the name doesn't really matter):
# export-and-deploy-site.yml

name: Deploy Kobweb site to Pages

on:
  push:
    branches:
      - main

  workflow_dispatch:

# Sets permissions of the GITHUB_TOKEN to allow deployment to GitHub Pages
permissions:
  contents: read
  pages: write
  id-token: write

# Allow one concurrent deployment
concurrency:
  group: "pages"
  cancel-in-progress: true

jobs:
  export:
    runs-on: ubuntu-latest
    defaults:
      run:
        shell: bash

    env:
      KOBWEB_CLI_VERSION: 0.9.16

    steps:
      - name: Checkout
        uses: actions/checkout@v4

      - name: Set up Java
        uses: actions/setup-java@v4
        with:
          distribution: temurin
          java-version: 17

      - name: Setup Gradle
        uses: gradle/actions/setup-gradle@v4

      - name: Query Browser Cache ID
        id: browser-cache-id
        run: echo "value=$(./gradlew -q :site:kobwebBrowserCacheId)" >> $GITHUB_OUTPUT

      - name: Cache Browser Dependencies
        uses: actions/cache@v4
        id: playwright-cache
        with:
          path: ~/.cache/ms-playwright
          key: ${{ runner.os }}-playwright-${{ steps.browser-cache-id.outputs.value }}

      - name: Fetch kobweb
        uses: robinraju/release-downloader@v1.10
        with:
          repository: "varabyte/kobweb-cli"
          tag: "v${{ env.KOBWEB_CLI_VERSION }}"
          fileName: "kobweb-${{ env.KOBWEB_CLI_VERSION }}.zip"
          tarBall: false
          zipBall: false

      - name: Unzip kobweb
        run: unzip kobweb-${{ env.KOBWEB_CLI_VERSION }}.zip

      - name: Run export
        run: |
          cd site
          ../kobweb-${{ env.KOBWEB_CLI_VERSION }}/bin/kobweb export --notty --layout static

      - name: Upload artifact
        uses: actions/upload-pages-artifact@v3
        with:
          path: ./site/.kobweb/site

  deploy:
    environment:
      name: github-pages
      url: ${{ steps.deployment.outputs.page_url }}
    runs-on: ubuntu-latest
    needs: export
    steps:
      - name: Deploy to GitHub Pages
        id: deployment
        uses: actions/deploy-pages@v4
Please confirm your main branch name above, in the on: push: branches: section near the top. These days, main is the standard choice, but your own project may use master or even some custom name.
There is a lot going on in the above workflow, but the key points are:
- It fetches your code.
- It initializes Java and Gradle.
- It manually downloads the Kobweb CLI binary from its own repo.
- It exports your site (same as if you had run
kobweb export --layout staticlocally). - It uploads the exported site as an artifact in a way that GitHub Pages can consume it.
The above script uses CLI version 0.9.16, which is the latest version at the time of writing this note. If a newer version is available by the time you read this, you can update the KOBWEB_CLI_VERSION environment variable to the new version. Older versions should work just fine, however.
Base path
An interesting wrinkle is that GitHub Pages deploys your site to a subfolder. This will look something like https://<user>.github.io/<project>/ (e.g. https://bitspittle.github.io/kobweb-ghp-demo/).
This means that if in your code you use an absolute path somewhere (i.e. one with a leading slash, such as /images/example.png), the browser will think you're asking to search against the root domain of the site and not the GitHub pages subfolder.
For example, /logo.png would be looked for at https://bitspittle.github.io/logo.png and not https://bitspittle.github.io/kobweb-ghp-demo/logo.png where it actually will live.
To deal with this, Kobweb lets users configure a basePath property in your .kobweb/conf.yaml. If present, then anytime Kobweb is passed an absolute path in your code, this prefix will be prepended to it.
Set basePath to the name of your repo.
site:
  basePath: "<repo-project-name>"
  # i.e. the name you chose for your repo.
  # In my case, the value: "kobweb-ghp-demo"
  # but your name is probably different...

server:
  # ...
Push your site
$ git add . && git commit -m "Set up GitHub Pages workflow"
$ git push
Confirm the workflow is running
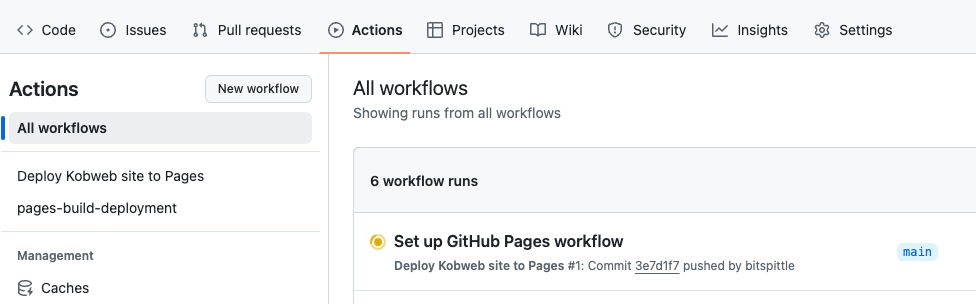
After pushing your changes, go to your GitHub project and click on the Actions tab. If you did everything right, you should see a new workflow running:
This workflow should take a few minutes to run. Note that subsequent runs may go a bit faster as the output of some of the steps are cached.
Before too long, the workflow should complete. If you open up its summary page, you should see a URL in the output of the deploy job:
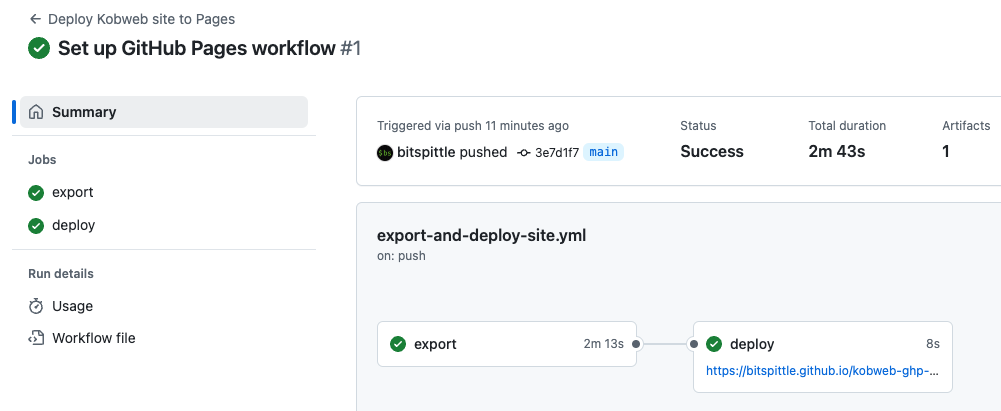
GitHub Pages: Finished!
If everything went well, you should have a page that is deployed!
Once it is ready, you can visit your GitHub Pages site, which uses a URL with a format like https://<user>.github.io/<project>.
For example, my site lives at https://bitspittle.github.io/kobweb-ghp-demo/.
Are you seeing something similar at your link? If so, congratulations! You're done. 🥳
If you're still having issues, feel free to compare your project with mine.
Conclusion
As you can see, static website hosting is cheap, fast, and easy to set up. There are a lot of options you can use besides the two listed here, including other popular features such as Firebase Hosting and AWS.
Compose HTML is an amazing API. And static website hosting is an amazing service. If you use Kobweb, you won't have to choose one or the other, but you can revel in the benefits of both!